Equipment List
Equipment
|
Quantity
|
1 meter ruler
|
6
|
Purified Water
|
1 Litre
|
i-H2GO Car Kit
|
1
|
iPod
|
1
|
i-H2GO App
|
1
|
Macbook
|
1
|
Tracker Software
|
1
|
Smartphone/Camera
|
1
|
Penknife
|
1
|
Cardboard
|
9cm X 13cm
|
Gluegun
|
1
|
Gluestick
|
1
|
Wheels
|
4
|
Plastic Spacer
|
4
|
Metal Rod
|
1m
|
Weights - 50g each
|
10
|
Pencil
|
1
|
Procedures
1. Creation of Cart and Modification of Car
- Draw the dimensions of the car.
- Later draw the shapes of the pieces needed on the cardboard using pencil.
- Cut out the shapes of cardboard using a penknife.
- Glue the cardboard together to form the cart using the glue gun.
- Remove the cover of the car.
- Place the cart in front of the car.
- Connect the cart to the car using glue and a metal rod.
- The end product should look like to picture below.
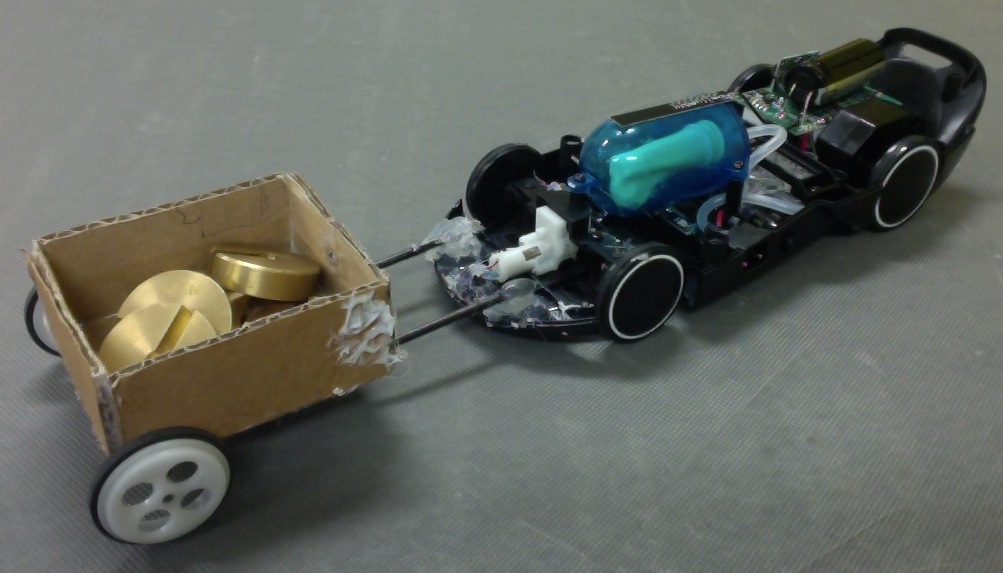
Figure 5 - End Product of Modified Hydrogen Car
2. CHARGING THE REFUELLING STATION
Make sure the refuelling station is switched “OFF” when charging. Even if the station produces hydrogen immediately, it is recommended to recharge the unit any time.
SOLAR CHARGING: The refuelling station can be fully recharged using the included Solar Power plant (charge time is 10 hours minimum in direct strong sunlight). 16 hours is preferred for ultimate performance. The refuelling station is fully charged when the right LED light turns green.
USB CHARGING: It will take 5-6 hours to fully charge the refuelling station before use.
It is recommended to recharge the refuelling station any time the unit is not used. The refuelling station is fully charged when the right LED light turns green.
3. ADD WATER
Carefully fill with purified/distilled water to a level covering the “Bubble Outlet”. Even clean tap water will reduce the lifetime of the refuelling station. Avoid overfilling. The approximate amount of water needed to cover the “Bubble Outlet” is 40 millilitres.
4. PRODUCE HYDROGEN
Switch the refuelling station to “ON”. You will notice 2 bright blue LED lights, bubbles coming out from the outlet and the plunger should be slowly rising. When the plunger stops rising and there are no more bubbles, the tank is full and the electrolysis process stops automatically.
5. CONNECT THE CAR TO THE REFUELLING STATION TO CHARGE THE CAPACITOR
Connect the “Hydrogen Hose” to the car’s “Female Input Valve” push lightly until it locks. The left LED in the refuelling station should flash red. When the left LED turns from red to green, the capacitor is fully charged.
6. PURGE THE IMPURE GAS
Check the water window on the back of the refuelling station. If there is water inside, go to step 8 to drain water first.
If there is no water visible inside the window, proceed directly to next step.
a. Switch the car to “OFF”.
b. Press the car’s purge valve down for 1 second and release.
c. Push down the refuelling station’s plunger about 1/3 of the way slowly and carefully to fill the car’s “Hydrogen Balloon”.
d. Press the car’s “Purge Valve” to release impure hydrogen until the “Hydrogen Balloon” is empty. Do this every time when filling the car.
7. FILL THE CAR’S TANK WITH HYDROGEN
a. Slowly and carefully push the plunger all the way down to fill the car’s fuel tank with the remaining hydrogen.
b. Be sure the left LED light in the refuelling station turns green before going to “C”.
c. Disconnect the “Hydrogen Hose” from the “Female Input Valve” – the car’s tank is full of hydrogen but now it needs to be warmed up! Be careful, do not touch the “Purge Valve” while disconnecting the car or purge the hydrogen from the tank.
d. Once the car is fully charged, the hydrogen production will automatically start up again if the station is in the “ON” position. Leave the station “ON” if you want to continue to use the car.
8. WARM-UP THE CAR
This is a very important step for your car to operate correctly.
a. Set the “ON/OFF/WARM UP” Switch on the bottom of the car to the “WARM UP” position.
b. Wait until the hydrogen in the fuel tank is empty.
c. Switch “OFF” the car.
d. Wait until the plunger has finished rising and the bubbles stop. Then complete steps 4-7 a few times. Now the i-H2GO is warmed and ready to go.
9. Pairing of the i-H2GO to the device
a. Turn the ON/OFF/WARM UP Switch to "ON", you can see the blue lights in the car are flashing.
b. Go to Bluetooth in your device's Settings
c. Turn Bluetooth on, it will take a second to search for devices.
d. Select i-H2GO. When prompted for a PIN code enter: 0000 and press “Pair”.
e. Wait until you see it display “Connected”. You can now exit settings and open the i-H2GO application.
10. Controls of the i-H2GO
Figure 6 - Screenshot of the controller app, iH2GO
- Open the iH2GO app on your iPod.
- Press the speed lock button, pointed by arrow 2, to ensure that the car can travel in a constant speed (Refer to Figure 6).
- Push the “button” pointed by arrow one upwards to the maximum to allow the car to travel at its top speed (Refer to Figure 6).
11. Conducting of Experiment
- Find a 6 meter flat, concrete straight piece of land.
- Place 6 pieces of 1 meter ruler along the length of the 6m land.
- Place a laptop, which is placed on a chair,, at the middle of the length of the 6m piece of land.
- Place the car at one end of the land. Make sure it is beside the rulers.
- Turn on the car.
- Start filming using the laptop.
- Drive the car alongside the 6 meter rulers. Film the car using the laptop, which is place on a chair.
- Ensure that the car moves in a straight line.
- Drive the car all the way until the end of the 6m piece of land.
- Stop the recording
- Add one 50g weight to the cart that is attached to the car.
- Repeat steps F to K until the car is not able to move.

Figure 7 - Photo of Experimental Set-up
Figure 8 - Top View of Experiment Set-up
Risk and Safety Precautions
Risk
|
Safety Precaution
|
Hydrogen is very light and very combustible, so if the container leaks, the hydrogen would flow away, become exposed to an oxidiser (oxygen, etc.) and may cause an explosion.
|
Ensure that safety goggles are worn before the start of the experiment
Ensure that parts of the car that would contain hydrogen are airtight, properly joint together and that there is no oxidiser in present.
Ensure that there is a fire extinguisher nearby.
Ensure that there is a fit aid kit nearby.
Ensure that the hydrogen is handled with care.
Ensure that all fans are switched off.
Ensure that there are no naked flames and bare wire.
Ensure that the exits doors of the lab are fully unlocked and opened.
|
Human exposure to hydrogen may lead to asphyxiate, meaning that one would be deprived of oxygen.
|
Wear a mask at the start of the experiment.
|
Collisions can cause damage to car
|
Avoid running obstacles.
|
Refueling Station will damage if distilled or purified water is not used.
|
Use only distilled or purified water.
|
Refuel the car using other refuelling stations other than the one provided may damage the car.
|
Use only the original refuelling station.
|
Data Analysis
1.Click the Open button  or File|Open File menu item and select a digital video (mov, avi, mp4, flv, wmv, etc.), tracker data file (.trk), or zipped tracker file (.zip) to open. You can also open still and animated image files (.jpg, .gif, .png), numbered sequences of image files, and images pasted from the clipboard.
or File|Open File menu item and select a digital video (mov, avi, mp4, flv, wmv, etc.), tracker data file (.trk), or zipped tracker file (.zip) to open. You can also open still and animated image files (.jpg, .gif, .png), numbered sequences of image files, and images pasted from the clipboard.

Drag the ends of the calibration stick to a video feature with known length (for example, a meter stick). Then click the readout to select it and enter the known length (without units). For example, in the figures below the scale is set in meter units using a video image of a white PVC pipe with black stripes every 10 cm.


Click the Axes button  to show the coordinate axes. Drag the origin and/or x-axis to set the reference frame origin and angle. A common choice for the origin is the initial position of an object of interest. For more information see axes, or for alternate ways to set the origin and/or angle consider a calibration point pair, an offset origin or the calibration stick.
to show the coordinate axes. Drag the origin and/or x-axis to set the reference frame origin and angle. A common choice for the origin is the initial position of an object of interest. For more information see axes, or for alternate ways to set the origin and/or angle consider a calibration point pair, an offset origin or the calibration stick.

The scale and reference frame origin and angle uniquely define the coordinate system used to convert pixel image positions to scaled world coordinates. In some videos the coordinate system properties may vary from one frame to the next (e.g., if the camera is zoomed the scale will change, or if panned the origin will change). Tracker makes it relatively easy to handle such videos--see coordinate system for more information
Click the Create button  and choose a track type from the menu of choices. Most moving objects are tracked using a Point Mass track or modeled using a Dynamic Particle Model track.
and choose a track type from the menu of choices. Most moving objects are tracked using a Point Mass track or modeled using a Dynamic Particle Model track.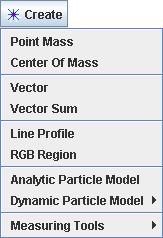
When tracking an object, mark its position on every frame by holding down the shift key and clicking the mouse (crosshair cursor) as the video automatically steps through the video clip. Don't skip frames--if you do, velocities and accelerations cannot be determined.
You can always adjust a marked position by dragging it with the mouse or selecting it and nudging with the arrow keys. Right-click the video to zoom in for sub-pixel accuracy.
The Plot View displays graphs of track data. Click the x- or y-axis label to change the variable plotted on that axis. To plot multiple graphs, click the Plots button and select the desired number. Right-click on a plot to access display and analysis options in a popup menu.


No comments:
Post a Comment